February 28, 2018

Your guide to the perfect at-home pedicure with tips from beauty expert Skyy Hadley.

The tools you need to get a spa-like pedicure at home:

  • Cuticle remover
  • Cuticle pusher
  • Cuticle nipper
  • Nail clippers
  • Nail file
  • Nail polish remover
  • Cotton balls or pads
  • Base and top coat

Here is a step-by-step guide to get the perfect pedicure:

  • Apply cuticle remover and allow it to sit for the time indicated on the packaging
  • Using a cuticle pusher, push cuticles back away from the base of your toenails. Clean feet with your body wash or soap to wash away cuticle remover
  • Use a cuticle nipper to very carefully remove any loose cuticle or hangnails. You don’t want to cut into your cuticles. Nicking this area can lead to infection.
  • If necessary, trim nails down to a good length
  • Use a nail file to smooth and shape your toenails
  • Using a cotton ball or pad, wipe each toenail with nail polish remover to remove excess oils
  • Next, apply a base coat to all toenails
  • Add nail color, apply two coats
  • Clean up, use a nail brush or an orangewood stick and polish remover to remove any polish slips
  • Finish by applying a clear top coat to protect your work

To make your feet less rough/sough stick your feet in a tub of warm water for about 15 minutes. You can add a capful of distilled white vinegar and/or a few drops of tea tree oil if you’re concerned about fungal infections. For water retention or particularly achy feet, toss in a couple of tablespoons of Epsom salts. Next, to slough off the dead skin, gently dry your feet, then have at the bottom of your feet with a serious foot file. I recommend using a Ped Egg to get rid of the dead skin.

For applying polish to prevent chipping or smudging reapply a layer or clear topcoat every two to three days.

I recommend using two particular products to make your pedicure last longer:

SHARE THIS POST ON: Facebook
February 25, 2018

How to Calm Crazy Waves and Unruly Curls International Curl Expert Shares Tips

For those with naturally wavy, curly hair of all coils and textures it may seem like an endless battle to find ways to tame the mane. Some may turn to relaxers, weekly blowouts or extensions. Others just want to master their natural hair in whatever mood it seems to be in. To help girls get a handle on their curls we connected with Maya Smith, founder of The Doux salon and product line of the same name both specializing in making the absolute most of the natural hair you’re born with. When it comes to healthy sculptured, cool looking curls of all types, Maya’s two decades of experience with curls worldwide makes her a true expert. Here she offers tips on how to calm crazy waves and unruly curls.

#1: My naturally wavy hair is flat at the top and then waves start in the middle with tighter curls at the back. HELP!

Genetics determine curl pattern and density. It’s totally normal, in fact, quite common for several different textures to exist on the same head of hair. These inconsistencies can cause the hair to look uneven, and are most apparent once the hair has dried. I created The Doux’s Mousse Def, to help define waves and curls in the less curly areas, and to combat frizz in the areas that are tightly coiled. To balance the look of curly and wavy hair, we recommend using a combo of a mousse on the straighter areas, and then a balm like The Doux’s Bonita Afro Balm Texture Cream for added stretch and control in the tighter areas. The goal here is to keep hair shiny, touchable, and soft. If shrinkage or frizzing remains an issue, don’t underestimate the power of a great haircut. Awesome products combined with a professionally-shaped set of layers is my signature Rx for accentuating curls that vary in texture.

#2: I have curly hair and let it dry naturally. The second it rains, I get frizzy at the roots. I find myself revolving my hairstyle around the weather report. HELP!

Thirsty hair will try to “drink up” moisture in the air if it’s not adequately hydrated.

The key to eliminating frizz due to humidity exposure is to make sure that the hair is thoroughly conditioned before styling products are applied. This exact problem is what inspired me to create a solution in the form of a Fresh Rinse Moisturizing Conditioner, followed by The Light Shine Mist helps to hydrate and stabilize the cuticle, making it less prone to reversion. For added control at the roots, we apply a small amount of Bonita Afro Balm, which is our secret weapon for keeping curly hair from swelling in harsh weather conditions. These products can be found at select Target stores nationwide and at TheDoux.com.

 #3: I often wear my curly hair slicked back into a tight low bun or ponytail. Will this damage my hair? 

Style in moderation. Traction alopecia is a major epidemic among women with textured hair. This is typically the result of too much tension being applied to scalp for an extended period of time, and usually occurs due to hair styling such as braids, extensions, and tight ponytails. To avoid irreversible thinning of the hair, it’s important to avoid hairstyles that place constant pressure on hair, particularly in the temple and nape areas. Ponytails and “slicked” styles should be taken down at night, and tight accessories, such as headbands or scrunchies should be worn less frequently. 

#4: I wear my naturally kinky hair twisted and braided. How long could I leave this style in and how best to shampoo my hair while in this style?

I recommend shampooing once per week for hair with fine-to-medium density. I urge clients with high-density or extremely long hair, not to exceed more than 10 days without cleansing the hair and scalp. This helps eliminate bacterial growth that causes itching, flaking, and dandruff on the scalp. We use The Doux’s Sucka Free Moisturizing Shampoo to remove product build-up and dead skill cells, and Fresh Rinse Moisturizing Conditioner to soften, hydrate, and balance the hair’s pH. We’ve incorporated Shea Butter and Sea Silk to smooth the hair shaft and aid in moisture retention.

#5: What are some ingredients to avoid that many products for curly hair contain? Why is this damaging? 

Petroleum-based “grease,” as well as products that contain mineral oil may be old-school favorites, but are often the cause of dry hair. Heavy products that aren’t water soluble can coat the hair shaft, disrupting the hair’s natural ability to retain moisture. This dryness may go nearly undetected, because the hair is covered in product, however, the underlying dehydration causes hair to be brittle and stubborn. We recommend cream-based products that shampoo out easily, and allow the hair to “breathe.”About Maya Smith:

Maya Smith is an International Master Stylist and Founder of The Doux Salon and haircare line now available in Target. With over two decades of styling experience Maya dedicated two decades to cracking the code on curl care, maintenance and expert styling. When it comes to caring for one’s natural hair and styling it, according to NaturallyCurly, Maya is among the best there is.

While still in high school, Maya got her hair cutting license and graduated from beauty school. Soon after graduating high school, Maya began following her passion and worked as an assistant for celebrity stylist Tracy Johnson. She learned from Johnson and progressed as a hair stylist for celebrities and entertainers. Years later the military wife would relocate to Germany, where Maya opened up her first salon The HoneyComb, a mecca for textured hair care for women from all over Europe, The UK, and as far as Africa. Maya’s unique system of textured hair styling sparked the development of The DOUX® haircare products, first launched overseas, and distributed throughout Germany, France, Italy, and the Netherlands.

Currently, Maya leads a carefully selected team of stylists at The DOUX® Salon in Macon, Georgia and celebrated the arrival of The DOUX® in select Target stores nationwide. Maya Smith, wife, mom of 5 and savvy business woman is an example not just for women of color but for all women who believe their gifts can impact the world, striving for entrepreneurial endeavors with grace, ease and hustle.

SHARE THIS POST ON: Facebook
February 25, 2018

5 Ways To Make Your Living Room Glam


If you want to be glam in all aspects of your life, then you need to look beyond your clothes and your makeup. Your home needs to be just as lovely. Perhaps the easiest room to start with when you want to create some glamor is the living room – it’s where you will spend a lot of time, plus when guests come to visit, it’s where they will be shown first. Here are some tips on what you can include to ensure you are as glam as possible.

Coffee Table Books

Coffee table books about fashion, photography, or attractive lifestyles in general, can really give a living room that ‘glam’ feel. These beautiful books are fantastic things to own, even if you don’t put them on display because they are lovely to look at and they are interesting too – every home should have a good number of books in it. Yet placing those books in full view on a tabletop elevates them, the room, and even you to another level altogether.

Full-Length Drapes

Drapes always look more glamorous than blinds, especially since you can order them in such gorgeous patterns, colors, and materials. They also add an extra layer of privacy that can create a more homely feel. The more comfortable you are in the room, the more glam you can make it look. Longer lengths of curtains give a more opulent, luxury feel to the room, and although that often means you’ll be paying more, sometimes that is necessary when you want your home to look perfect.

Gold Accents

Too much gold will make your living area look cheap rather than glam, but hitting the right amount can really add some loveliness to the room, and it will certainly impress your guests. What’s really fun about adding these gold accents is that you can choose anything you like to do it. You might have wallpaper with a tiny hint of gold to it. You might have a gold light fitting. If you’re looking for a more understated look, though, and your partner or member of the family is part of the military, you could gift them with challenge coins from https://www.challengecoins4less.com/ and put them on display. After all, they’re great achievements.

A Beautiful Rug

Picking the right rug for your living room and ensuring that it can be seen rather than covering it up with furniture is a very glam thing to do. You don’t want a plain old boring rug; you need a statement piece that’ll get people talking. The great thing about a beautiful statement rug is that it can change the entire look and feel of your living room without you needing to spend too much on a complete overhaul. If you find cushions that match, and even drapes, then the whole room will look much more cohesive.

Candles

Candles are perhaps the simplest way to glam up a living room, and they always look lovely. Just a few dotted around in perfectly chosen candleholders (perhaps you could even choose gold ones to incorporate that extra touch of luxury) create a glam look every time.

SHARE THIS POST ON: Facebook
February 24, 2018

Is Fashion Keeping up with Evolution?

Over the last 150 years, the average height of Western populations has grown by around four inches. That’s quite a substantial change over a relatively short period of time. Height isn’t the only thing that has changed; human weight is increasing at a faster rate than ever before, and there are more obese people now than at any previous point in history. These changes are mainly due to the effects of improved standards of living and healthcare rather than evolutionary or genetic causes, but they still represent a comparative form of evolution. With the shape of human bodies undergoing such seismic shifts, what are designers and clothes manufacturers doing to address these changes, if anything?

Size exact

Clothes are made based on an original design, with the proportions increased as the sizes go up. The problem with this model is that there are very few people who conform to the template version of human physiology. This means that for clothes to fit, you may be forced to make a compromise. To get your pants to do up, you may need to buy them a size larger, which then means you have too much length in the legs. To fit a shirt across your bust without the buttons popping off, you may have to buy one that’s too long in the arms. Or maybe you’re tall and skinny, and if you buy a sweater that has long enough arms, your body is swamped in a woolen tent. There are as many difficulties getting clothes to fit as there are differences in the shape of the human body.

Specialist retailers

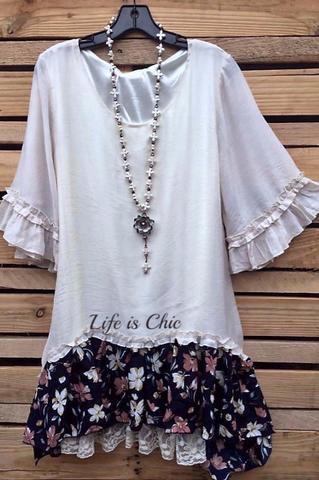
The growth of the Internet and online shopping has made supplying specialist markets far more viable for retailers. When plus size women from anywhere across the world can order their clothes from you, your business’s client base expands enormously, instead of being restricted to a local populace. There are specialist outlets for many body types now, for example, shorter women (petite), taller women (over 5’8”), and plus size women (size 12 and above), like the Life is Chic Boutique – plus size online boutique.

Handmade and bespoke

Many women who struggle to find well-fitting clothes turn their hand to making their own. If you have the skills and the time, this could be an ideal solution, as you can make any item of clothing tailored to match your physique. If your talents aren’t well-suited to needlework, learning how to sew at evening classes might be an idea, or if you have no desire to become a dressmaker, you can hire a professional and get made to measure clothes. This option does come at a premium, unless you can find a local seamstress who is able to make clothes for you.

How technology is helping

There are several technological innovations that can help you find clothes that fit your shape and look good on you as well:

  • Visual search technology can use scanning to match size, proportions, shape, and color
  • Augmented reality-enabled virtual fitting rooms that simulate the experience of trying clothes on
  • 3D body scanners take complete measurements that will ensure clothing fits your exact body shape
  • Avatars are being used to enable the design of clothes that will fit any required body shape
  • Software that can cope with the differences in clothes sizes between brands, so you can match the fit and not rely on variables in sizing

Real women

Several years ago, women finally got tired of being fed the same idealized version of body shape by fashion designers and the media, and became increasingly vocal about the need for the industry to change. Some of them took matters into their own hands by launching companies selling clothing for real women instead of Miss Average, and these companies have been very successful. Plus size ranges are being backed by major advertising campaigns, and all sizes and shapes are being offered complete ranges of fashion clothing, swimwear and lingerie, instead of just vast billowy dresses designed to cover the shape of your body rather than showing it off.

High fashion

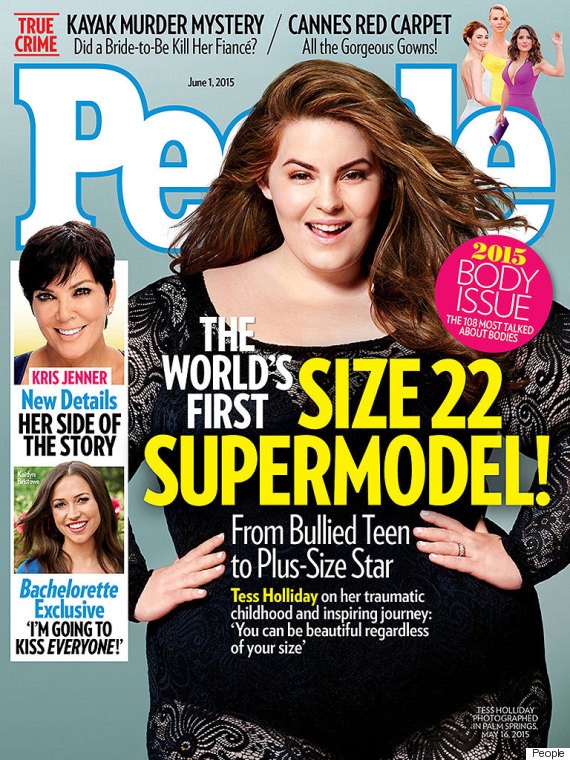
The catwalks and haute couture designers are notorious for using tall, slender models to show off designs. They have come under a lot of criticism in recent times, because of the poor body image problems young girls have been suffering as a result of having stick-thin models displayed as the ideal. Magazines and websites have been similarly criticized, and further taken to task for the use of photoshopping techniques and airbrushed photographs. Rather than looking to design clothes for real body shapes, the industry seems to have been putting all its efforts into making its models seem ever more unrealistically perfect. There are some signs that things could be changing, however, for example, there are far more plus size models fronting key promotional campaigns. Many plus size and realistically proportioned models such as Tess Holliday and Ashley Graham are creating huge social media followings and being given lucrative modeling contracts. They are adored by women because they represent body shapes that normal women can identify with.

So, is fashion keeping up?

There is progress being made, but at a frustratingly slow pace. The averagely proportioned mannequin is still the main blueprint for clothing design and manufacture. Most catwalk models are still tall and willowy, and magazines still predominantly use slender, idealized models for their photo shoots. One of the key problems is that models that don’t conform to the manufactured ideal shape are still not taken seriously in the wider industry. Although they may be feted for what they are doing and what they represent, they are still always referred to as “plus size” rather than just “models.” The implication here is that they are different from the norm, and that although this is admirable, they are not equal to the industry standard models. A change in attitude across the fashion industry and society as a whole needs to take place so that women are seen as equal to each other whatever their shape, rather than being judged on a scale that holds size zero as the perfect shape.

SHARE THIS POST ON: Facebook
February 23, 2018

Emma Roberts Wears 7 For All Mankind

LOS ANGELES, CA – February 21, 2018 – Emma Roberts was spotted wearing 7 For All Mankind while out and about in Los Angeles yesterday! The fashionista stepped out to grab some coffee in the b(air) Denim High Waist Ankle Skinny with Released Hem in Sunset (similar style here .
Images courtesy of Backgrid
Follow 7 For All Mankind
View on Instagram
SHARE THIS POST ON: Facebook
February 22, 2018

Are My Child’s Teeth Healthy?

As our children begin to grow and get their adult teeth, parents worry if they are getting them at the right age and if they are healthy and normal. There is no exact science to when a child’s permanent teeth will come in, but there are some things that parents may worry about when these teeth begin to grow through. One of these is mamelons, which are small bumps that naturally occur on the teeth. Read on for more information about these and why they are normal.

What Is a Mamelon?

A tooth may have bumps or ridges, which are known as mamelons. They usually form along the edge of a child’s new permanent teeth and they are very common. An uneven or bumpy tooth does not mean a tooth isn’t healthy; mamelons actually help push these new teeth through your child’s gums. They may look different in different children, some looking rougher than others. The most commonly affected teeth are both the upper and lower central and lateral incisors. For more information on mamelons, check out Health Row and why as a parent you should never be concerned.

How Do Mamelons Form?

Three types of cell within the body begin the formation of teeth in the gums. These cells, along with the help of ameloblasts and odontoblasts, form along the edge of the teeth. The teeth are made up of layers of enamel and dentanil, and as these layers form and move forward, this eventually makes a tooth as we know it. When all the cells join together, they form enamel lobes, which are seen as on the edge of the teeth as they come out of the gums.

When Should I Be Concerned?

Mamelons should never be a concern, and although parents may worry when a tooth comes out wobbly or rough, these will eventually straighten themselves. As we continue to grow and eat, these mamelons slowly wear down until they look like normal teeth edges. This may take a shorter or longer time, depending on the roughness of the edges of the teeth and how many teeth were affected, to begin with. If your child is going to get braces, an orthodontist may get rid of mamelons, as it can make the teeth look misaligned, even with the help of braces. This is the only reason they would ever be removed and is simply for aesthetic purposes. It is a simple and pain-free procedure that your child does not need to worry about.

Once mamelons have done their job and their adult teeth have come through, they will begin to naturally wear off over time. Understanding what these are will ensure you do not worry, and if your child asks, you can explain what these rough edges are. The best way to help your child to have healthy teeth is limiting the amount of sugar they eat and drink, promoting good oral hygiene from a young age, and visiting a dentist frequently.


SHARE THIS POST ON: Facebook
February 22, 2018

What Should I Expect After My Facelift?

A facelift is a popular cosmetic procedure that removes signs of aging and tightens up the face, jaw, and neck. During the surgery, your doctor will remove excess facial skin and reposition the face and neck tissues to achieve the desired results.

If you plan to have a facelift, you may be worried about the recovery period. Fortunately, most people have a fairly easy and comfortable recovery from this surgery. Your experience will depend on what type of facelift you had and how much work was done, but there are some things that everyone can expect during their recovery.

Immediately After Surgery

When you wake up from the procedure, your incisions will be covered with large bandages that put pressure on your face to minimize swelling and bruising. Your doctor will probably have placed a small tube in the skin behind one or both of your ears to drain fluid or blood.

Most people feel very groggy for the first few hours after waking up. It’s also common to feel dizzy or lightheaded, so you should be careful when standing up and moving around. You should always have someone with you when you need to get up. Your doctor may want you to stay overnight in the hospital for observation, but most people go home the day of their surgery.

Your face will probably hurt immediately after your surgery, but your doctor will give you pain medication to manage the discomfort. For most people, pain is only an issue for the first day or two of the surgery. Your doctor may prescribe you pain medication for the first few days or the first week of your recovery, or you can take over-the-counter painkillers.

You’ll need a caretaker to drive you home from your procedure and stay with you for at least 24 hours. This should be a trusted friend or family member who can bring you what you need and take you back to the hospital in case of an emergency.

First Week of Recovery

A day or two after your surgery, you’ll see your doctor again for a follow up visit. Your doctor will remove the drainage tube, apply an antibiotic ointment, and maybe apply new bandages. After a couple days, you should feel well enough to start moving around the house. Moving will help improve your circulation, which will shorten your recovery time. However, you should still take it easy, avoid strenuous activity, and get plenty of rest.

Make sure that you don’t put pressure on the incisions. Don’t sleep on your side, and don’t wear anything that needs to be pulled over your head. The incisions will crust over as they heal, but you shouldn’t touch or pick at them.

Two or three days after your surgery, your bandages will be switched out for a facial sling or compression garment. The swelling will probably reach its peak three or four days after the surgery and then start to decline. You’ll have to keep your head elevated while you sleep to help with the swelling. Bruising is still common at this point, too.

One week into your recovery, your surgeon will remove your stitches and check the incisions for infection or inflammation. At this point, you should be able to sleep flat instead of elevating your head.

Second Week of Recovery

Some bruising and swelling on your face and neck is still normal during the second week of your recovery. You may also see bruising around your eyes or behind your ears. Some people feel a strange tingling or burning sensation around this time. This is normal, but if you’re concerned, you can always call your doctor to make sure nothing’s wrong.

You still won’t be able to do any heavy or strenuous activity, but you shouldn’t be bedridden. You may feel self-conscious about being seen in social situations because of the swelling, but you should take easy walks to help with your circulation. Your doctor will advise you against going out in direct sunlight, though. You can apply makeup around the edges of your incisions or scars to cover them while you wait for them to heal.

Long Term Results

During the third and fourth weeks of your recovery, the incisions should start to look much better. They’ll look puckered or bunched up after the surgery, but they’ll smooth out during weeks three and four. At this point, you should be ready to return to work or to your normal social situations. There may still be some noticeable swelling, but everyone heals at a different pace, and it’s hard to predict how quickly you’ll recover.

It takes a full year for the permanent results of your facelift to be visible. Residual swelling and tightness can last for months. You also may experience changes in skin sensation for a year after your surgery.

If you ever have any questions or concerns about your surgery or your recovery, you should contact your doctor. It never hurts to get an additional checkup to make sure you’re healing properly. Following your doctor’s post-op instructions is the best way to achieve great results and have the most comfortable and successful recovery possible.

Dr. Stephen Weber is a board certified facial plastic surgeon in Denver. He and his team perform facelifts and a variety of other cosmetic procedures and reconstructive surgeries.

SHARE THIS POST ON: Facebook
February 22, 2018

What You Need To Know When Building A Tiny House

When it comes to building a home, you’ll want to make sure that you have an effective plan. Tiny houses are now all the rage, with these 400 square foot homes being something that many single people or couples want for them. It isn’t only easy to clean and maintain but it also looks aesthetic to look at. And did I mention it’s less expensive than building a grand house?

While tiny homes are all the rage today, not a lot of people know exactly what it takes to build one. For those who are wondering about how they can build a tiny house, read on to learn more!

  • Setting The Budget

Tiny houses don’t need to be so expensive but there are quite a few models which can take a toll on your budget. That’s why it’s important to have a strict budget even from the beginning of you planning for your tiny home. Some people build tiny homes from just a few hundred dollars down to sending thousands! Take note that if you aren’t able to build parameters on how much you should be spending, you wouldn’t be able to control it and may go overboard.

When setting a budget, make sure that you develop a master plan. You’ll need to know exactly how your house would look like, the materials to use, as well as how much material you’ll need. After that, do the research online and calculate how much you’ll be needing and add a 10% cushion to that, just in case. And there’s your budget!

  • Know Where the Home Is

When building a tiny home, expect it to have wheels and be able to move around a lot. No need to stick to one area! But that’s also something you have to take account for. You shouldn’t build a tiny home if you don’t know where you’ll be able to place it in. Just because a tiny house has wheels doesn’t mean you’ll be moving it around states once you complete the construction.

I recommend that you build your tiny home in areas near hardware stores. That way, you’ll be able to take quick trips to the hardware store if ever you need anything.

  • Consider The Insurance

People are taking care of the materials and how to build their tiny houses, but the one thing that they forget is their insurance! Remember that if you own a tiny house that’s designed to be placed on existing land permanently, then you should cover it with a home insurance policy. BUT, if your home is on wheels, then there are other options to take note of. For those who will be moving their homes not over once every year, then get a stationary trailer insurance policy. For those who plan to move over once a year, then a travel trailer insurance policy works best.

  • Size and Layout

The one thing people usually do wrong when building a tiny home is that they have a ton of things to consider along the way. There are a ton of must-haves for their home, ending up with it looking impossible or cluttered. That’s why instead of you thinking about your home’s tiny layout to sacrifice the “must-haves” think about the small spaces in your home, which can give you a chance to see what you can do. Look after the size and layout first before you add anything you feel like is a “must-have.”

  • Try It Out Before You Buy

It’s crucial to test or check out a tiny home before you get one (if you plan on getting a pre-constructed one rather than build one ground up). So before you do plan on purchasing one, try to rent a tiny home and spend one week in it, getting a feel and seeing if it’s right for you. Rent tiny homes with spaces and layouts similar to what you want. This will help you weigh the pros and cons of your dream home.

Wrapping It Up

And there you have it! Building a tiny home may not be as different as building a grand home, but there are still things you’ll still need to learn in order to ensure that your home will look and feel beautiful from the moment you begin building it down to the final product.

I hope that this article on what you should know on how to build a tiny house helped you out. So don’t wait any longer and begin your plans on building a home with Best Builders or on your own today!

If you have any questions or would like to share your tips and experiences on building a small house, then comment down below. We would love to hear what you have to think.

SHARE THIS POST ON: Facebook
February 20, 2018

Handy Tips For Getting Your Newborn To Sleep

“Will my baby sleep through the night?” This question is often asked by many new (and exhausted moms), the answer is yes! However, some babies will be angelic and sleep through when they are very young; others may take that little bit longer. Unfortunately, there is no firm timetable, so all you can do is create the best conditions for your little one.

All babies have different sleep patterns, but it is really after six weeks that regular sleep cycles start to develop. At this time, they will have no concept of night and day and will sleep for up to fifteen hours, although not all at once! Breastfeeding mothers are more likely to feed on demand, for example, when the baby is awake and hungry (and when their milk is available) so in the early weeks it is difficult to develop a pattern, but this will soon happen. The main thing in the early stages is to ensure that your baby is comfortable and safe and part of that is choosing the right place for them to sleep.

Bassinet or Crib

Every girlfriend, parent guide, experienced mom will have their advice to give, and the stores are full of different options. In the very early stages, when you bring your new bundle home, a glamorous bassinet is a great option. You can keep the baby close to you, in your bedroom if you wish while you try to relax, and it will take up much less room than a crib and is also a more economical option. Your baby will feel snug and cocooned, rather like still being in your womb, and will gain a sense of security and warmth, enabling them to settle more readily for sleep. Don’t forget to make time for yourself while the baby is sleeping; you can read a book to unwind, try to catch up on sleep yourself or try a relaxing pursuit such as origami way.

Moving on

As your baby grows and becomes more mobile (turning in their sleep) they will need more space, so this is the time to consider moving them into a crib. By this age (usually three to six months) their feeding patterns have normally emerged and therefore the need to have them close to you is less, so they can move into the wonderful nursery that you have prepared for them. One of the sensible options to consider when you are selecting your crib is one that will eventually convert into a Junior Bed – this not only saves you money but means that your child will already be familiar with their sleeping environment and the only change will be that the bars have been removed.

Disruptions to sleep

As your baby’s body changes and they become more ‘physical,’ meaning they are now completely rolling over or pulling themselves up against the bars of a crib, you may see a change to their nightly sleeping pattern. Don’t panic – this is often a short-term ‘blip,’ and very soon they will be back to their established routine. Whatever their age, it is really useful to develop a routine, whether it is their nightly bottle for little ones, a ten-minute rock in your nursing chair, or even a gentle massage. Whenever this activity occurs, your little one will recognize that it is time for bed and sleep. Then you and your family can turn on the night light, kiss them goodnight and relax!

SHARE THIS POST ON: Facebook
February 15, 2018

Dare to be Bold – SinfulColors Cosmetics

It’s time to get on trend with your makeup routine and add some bold colors with SinfulColors Cosmetics!  SinfulColors has teamed up with Vanessa Hudgens bringing you 18 insanely awesome products!

Bold Brow™ Intense Effects, $6.99

  • Dual ended product with metallic and shade-shifting iridescent colors
  • Cream formula
  • Available in two color duos 

Diva Lash Color Mascara™, $5.99

  • Color rich formula, powerful payoff and voluminous shine
  • Wear one color or mix and match for an unexpected contrast
  • Available in 4 shades

Stop & Stare™ Gel Eyeliner, $5.99

  • Easy to use pencil
  • Sharpenable pencil design keeps the gel liner tip super fine
  • Available in four shades

Shady Babe™ Duo Cream Shadow, $6.99

  • Dual ended shadow adds depth and definition
  • Smooth formula
  • Available in four shades

Face Forward™ Allover Highlighter Stick, $6.99

  • Highlighters illuminate and enhance your natural glow
  • Ultra-blendable cream to powder formula
  • Available in four shades

The SinfulColors Cosmetics line is available exclusively on Amazon.

SHARE THIS POST ON: Facebook