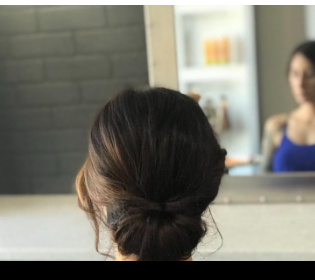
Final look using Tony Odisho hair tools and products
Brides-to-be and recent brides know that planning a wedding is hard work. From booking the venue to locking in the catering. It can be stressful to try to get everything done in time. But one of the biggest stressors is figuring out the perfect bridal hairstyle. Whether you plan on doing your hair yourself or seeing a professional, it’s important to have a style you love. This easy bridal hairstyle tutorial will show you the tools you need and the steps to take for a gorgeous wedding day look!
*What you’ll need*
– Volumizing Mousse <https://tonyodisho.com/shop/
– Flexible Hold Hairspray
<https://tonyodisho.com/shop/
– Tony Odisho Infrared Curling Iron
<https://tonyodisho.com/
– Strong Hold Hairspray
<https://tonyodisho.com/shop/
– 3-in-1 Mis <https://tonyodisho.com/shop/
*Step 1 – Prep hair*
You’ll want to start with hair that isn’t freshly washed. Preferably a day or so will have passed since the last wash. This will help the style hold better. When you do wash it, use Volumizing Mousse to add body and texture. On dry hair, spray Flexible Hold Hairspray for heat protection and a workable hold.
*Step 2* *– Add some loose curls*
Using the Tony Odisho Infrared Curling Iron, create loose curls. They don’t have to be perfect since they’ll end up in an up-do later on. When you’re done curling, comb out hair.
*Step 3* *– Pull back section of hair*
Separate hair, leaving two sections in front. Take the section of the hair in the back and center, and pull it into a loose ponytail. Hold in place with a small rubber band that matches the hair.
*Step 4* *– Flip ponytail inward*
Gently create opening above rubber band, then push the bottom of the ponytail into that gap and pull through.
*Step 5* *– Pull back remaining sections of hair*
Pull the last two sections of hair back and tie together using another small rubber band, to create another layer of texture.
*Step 6* *– Tuck ponytail to create bun*
Tuck the ponytail up through the opening above the rubber band like you did in Step 5, but this time don’t pull the hair all the way through. Nestle it into that section to turn it into an up-do.
*Step 7* *– Finish with hairspray*
Use the Strong Hold Hairspray to finish your up-do and hold it in place all day long!
*(Optional) Step 8* *– Add shine using 3-in-1 Mist*
3-in-1 Mist is the perfect addition to a finished bridal up-do because it adds a natural, lightweight shine while protecting your hair from UV rays. And that’s it! This easy, elegant up-do makes the perfect bridal hairstyle, whether you do it yourself, get help from a friend, or hire a professional. It also won’t tack on too much time to getting ready for your big day, which is always a plus. For more hair inspiration and hair care tips, check out tonyodisho.com.
Speak Your Mind