March 27, 2018

Foxy Lady – New Hard Candy Marbleized Baked Powder

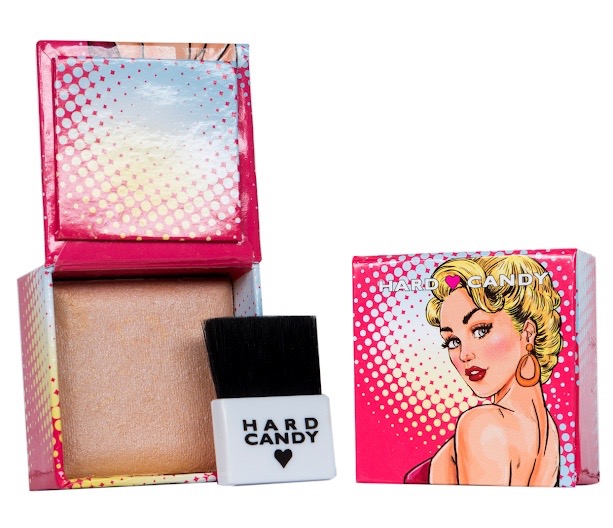
Channel your inner fox with the NEW Hard Candy Fox in a Box Scented Marbleized Baked Powder!  Achieve that sheer, healthy, natural glow with the finely milled mica pigments, complete with a brush for easy blending and application.  The desired scent is just a scratch and sniff away on the outer sticker.  So go ahead and unleash the fox from within with these custom blended shades inspired by different moods and personalities.

Hard Candy Fox in a Box Scented Marbleized Baked Powder, $7
A smooth, baked formula that delivers multi dimensional yet sheer, buildable colors to offer and healthy and natural glow
To apply, swipe a powder brush into the pan and blend into the skin

The Hard Fox in A Box Scented Marbleized Baked Powder are available at Walmart and Walmart.com

SHARE THIS POST ON: Facebook
February 23, 2018

Vintage Makeup, a modern Take

Vintage makeup is always coming back into fashion with a new twist on the original application. Although there are new techniques, products, colors, and textures that change the old version of vintage makeup, history can be found with each new trend. Retro makeup goes back much further than the last 100 years. Smokey eyes were worn by Egyptian women thousands of years ago and bright red lipstick was worn in Asia more than 1,000 years ago. This look can easily be seen in traditional Chinese paintings. Europeans did not use makeup until just a few centuries ago. Mixing modern with vintage is nothing new. There are some makeup trends that keep coming back time and time again. Each generation will be sure to experience most of the trends that have been repeated.

vintage makeup

vintage makeup look

1930s
Overdrawn Lips
Then: Long before the overdrawn lip of 2015 became trendy, Hollywood starlets were tracing outside their normal lip line to create the illusion of a fuller, curvier pout. No injections required!

Now: The same look is created using lighter lipstick and lip liner colors. Injections have been used for clients that can afford them.

Heavy Blush
Then: Healthy, glowing skin was a staple in the ‘30s. Lots of blush was used to obtain that sought-after, flushed, radiant look.

Now: These days, more and more women are keeping things simple on their lips and eyes while giving their cheeks a touch more color for a more youthful glow.

Heavily Penciled Eyebrows
Then: The super thin eyebrows of the ‘20s did not stand a chance in this decade. Eyebrows had a heavier, defined look that showed no gradient or blending.

Now: It is trendy to now fill in the eyebrows using a darker-than-normal eyebrow pencil. Keep everything modern by following the natural eyebrow shape. If the client’s eyebrows are arched, keep the arch. If the client’s eyebrows have a curve, follow the curvature.

Soft, Smokey Eyes
Then: The smokey look was lighter and perfected without using a liner, offering an exotic look without making the eyes look smaller.

Now: Skip the tricky liquid eyeliner. Sweep a flattering shade of bronze-pink shadow across the client’s eyelids and along the lower eyelash line. Add at least two coats of mascara to curl the eyelashes for a defined, yet soft look.

Straight Eyebrows
Then: Straight eyebrows framed the eyes in the most dramatic way.

Now: This look may not be a good everyday look, but it is fun for a unique night out. This trend is gaining much attention in Korea.

1940s
Coral Blush
Then: Orange shades were used on the cheeks and were very popular for a healthy, glowing look all year round.

Now: A peachy-pink shade is a pretty safe bet if the professional is unsure of which shade to use for the client. Paired with a nude lip color, this look helps to avoid going overboard on the warm side. This look is a safe choice for most skin tones.

Orange Red Lipstick
Then: To ensure the lips kept the attention, the rest of the makeup was muted.

Now: An orange-red lipstick is now paired with glowing skin, along with the same muted eye makeup as listed in the ‘40s.

Matte Skin
Then: Pressed powder was used quite often to erase shine, giving the skin a perfect matte finish.

Now: Matte skin is still popular, but with a subtle twist. The focus should remain radiant, never flat. Regular exfoliation and proper moisturization will keep the powder from looking caked and dry. The now popular HD powders are much lighter in texture to help achieve a more transparent matte finish.

1950s
Strong Red Lips
Then: Full, red lips with emphasis on the peaks on the top lip were very popular. Use a pointed lip brush for a more precision lining application. Be careful not to over exaggerate the lip lining since red can look clownish if done incorrectly. This decade usually applied a moist, creamy lipstick for a slight shiny look.

Now: A softer bow is created and a more matte formula is used for a modern twist. Complete the lip with softer eye makeup than was used to complete the look in the ‘50s.

Contouring
Then: Contouring is by no means a new makeup concept. Many movie stars of the past have contoured their faces. It was a staple technique.
Now: Contouring has grown increasingly popular in the past several years. The final look, compared to the ‘50s, is softer and more well-blended.

1960s
White Eyeliner
Then: White eyeliner was used on the bottom waterline to make the eyes look bigger and brighter.
Now: Using a light eyeliner on the bottom waterline is still used to make the eyes look larger. For a more subtle look, replace the white eyeliner with a nude liner for light-to-medium tones. For medium-to-dark skin tones, use a light blue color.

Purple Lipstick
Then: A sexy purple-colored lipstick was used to give the wearer an innocent doll-like look. With this look, the focal point of the face were the lips; the cheeks were muted.

Now: Purple shades of lipstick are still in fashion, but the only difference is that it might be paired with purple hair. There are many more shades to choose from that are suitable for all skin tones.

Cut Crease Eyeshadow
“Cut creasing” is when the crease is defined by using a contrasting eyeshadow color to “cut” across the eyelid. Very little blending – if any – is used to maintain a sharp, defined look.

Then: This look was seen a lot in the 1960s. The eyes were kept smokey while the rest of the makeup style was subtle.

Now: Mixing modern with vintage is also the new twist for this trend. Create an even sexier look using shimmery shades.

Long False Eyelashes
Then: Trademark false eyelashes were often placed on both the top and lower eyelids. The eyes were the focal point while everything else remained soft.

Now: Today, there is more variety from both black and brown false eyelashes to eyelash extensions; there are also many more designs and styles. Eyelashes are more often placed on the top eyelids only. The eyes are still the main focus.

Thick Eyebrows
Then: Thick, lush eyebrows that perfectly frame the face were the popular choice over tweezers.

Now: After the over-tweezed eyebrow of the 1990s and 2000s, full eyebrows have made their comeback. This trend works on most, but not all. Pick a shape that works for the client and fits their face, personality, and lifestyle.

Winged Eyeliner
Then: Popular in the ‘60s beauty routine, winged eyeliner extended a half-inch past the eyes, creating an exotic, sexy look.

Now: Winged eyeliner is now called the “cat eye.” This look comes in all styles and shapes and is a go-to classic look that will keep the focus on the eyes.

Pink Is In
Then: Pink came in the form of powder pink lips, as well as two coats of mascara with pastel pink eyeshadow.

Now: Go for a softer, more natural pink on the lips and add a light silver shadow on the eyes to accentuate them.

1970s
Pastel Eyeshadow
Then: Opaque eyeshadow applied from the eyelash line to the eyebrow and is a hard look to pull off. Many women ended up looking a hot mess! This catastrophe was due to the limitation of color selection available at that time.

Now: Bold pastels are now gorgeous, but not always placed from the eyelash line to the eyebrow. A matte texture is used for a softer and modern look.

1980s
Purple Eyeshadow
Then: The ‘70s were all about tons of blues, purples, and pinks. Purple was a staple for eyeshadow shades.

Now: Today’s version is a blended purple smokey eye that is perfect for a sexy evening look.

Natural Eyebrows
Then: The ‘80s eyebrows were left untouched; they were kept as natural and bushy as possible.

Now: Eyebrows are considered striking when they are barely touched. A little shaping and some filling of the eyebrows is ideal when keeping with the eyebrows’ natural shape and thickness.

Orange Eyeshadow
Then: Orange eyeshadow and matching lipstick were a popular combination in this era.

Now: The modern version of orange eyeshadow sways toward a metallic copper color. This shade is a flattering look for all eye colors.

Wild Lipstick Colors
Then: Bright, unconventional lipstick shades, such as green, blue, and yellow, were trendy at the time. These shades brought a more creative style to the era for a dramatic, quirky look.

Now: Alternative lipstick shades have made a huge comeback. High fashion runway models to mainstream women have scrambled to obtain the right shades of blue, purple, and green that are unique and unconventional.

1990s
Metallic Eyeshadow
Then: This was a bold fashion statement that included shimmery eyeshadow applied all the way up to the eyebrows.

Now: Metallic eye makeup has been all over red carpets and runways for the past few years. More subtle than in the ‘90s, this look should use warmer rose gold shades with a focus on the eyelids. Skip any application of eyeliner.

With each passing fashion week comes a new set of makeup trends for editors and bloggers to glorify. The new spring and summer trends of 2018 are a great example. For instance, there are already two new trends for the season that have been recycled from the past with a twist. The cat eye is still going strong and the “Twiggy” eyelashes on both the top and bottom eyelashes are making a comeback. Spiked eyelashes, like in the 2000s, are also making a comeback, but with a softer look than before and appearing in combination with a soft eye and lip.

Be sure to take time to learn enough about current trends to be able to have many choices to fit the client’s face and lifestyle.

Written by Michelle Richardson, L.E. and professional makeup artist

Michelle Richardson is a licensed aesthetician and professional makeup artist with over 25 years of experience. She has worked for numerous retail cosmetic lines, including Estée Lauder, Lancôme, and Christian Dior. Richardson is the co-owner of the California Makeup Academy – Training Center for professional makeup artists and the co-owner of Your Makeup Line, a private label branding company.

SHARE THIS POST ON: Facebook
January 21, 2018

Judith August’s Iconic Concealer Gets A Make over

Judith August Founder Judith August

Judith August Founder Judith August

Judith August, founder and President of Judith August Cosmetic Solutions announces, “After 30 years, it’s about time.”

A girls got to do what a girls got to do.” says August. We all need a bit of rejuvenation and it was time for The Everything Pencil to look a bit refreshed. A clear bold look on the outside, but the same incredible coverage on the inside.

Developed through her work with Cosmetic Surgeons in Los Angeles in 1986, Judith’s formula has been endorsed by surgeons, skin care professionals, and makeup artists nationwide. The company is proud to reach its 30 year anniversary of developing and marketing cosmetic products that cover up and conceal just about anything from simple annoying flaws to serious coverage.

Because of its status as a Best-Seller, Judith considers the easy-to-use Everything Pencil to be her signature product. She explains that it works like magic to cover age spots, under eye darkness broken capillaries and more—all detracting features that are not unique to women. The Everything Pencil is small and portable, that can be placed in your pocket or purse. But the reason that it’s so popular, according to customer and even celebrity testimonials, is that it works! For those with acne, The EraseZit – Acne and Blemish concealer pencil will camouflage while your skin gets natural benefits such Tea Tree Oil, and Camphor.

Interestingly, it isn’t only women who are blown away by the results of these remarkable beauty products. Judith believes that concealers play a pivotal role in the psychological well-being of both women and men. In fact, Judith’s hottest selling The Everything Pencil – Face & Body Concealer is equally popular among both sexes. Men, after all, are just as likely to want coverage for scars or, on occasion, even tattoos, and her product, Killer Cover can do just that.

“As a young girl in the world of modeling I realized that, Everybody’s’ Got Something to Hide!” This has been her motto for many years as she worked among elite models and actresses continually noting that, nobody is perfect! Women in all walks of life can feel insecure about their imperfections. She teaches through her website and her book, “Gotcha Covered – The Compact Guide To Camouflage Makeup”, that with the right cosmetic products, right colors and right application techniques, we can all look “nearly perfect!

Ms. August’s main focus is to remain accessible to the needs of her clients. Listening to client feedback and suggestions has kept Judith ahead of the competition by leaps and bounds. Customers are treated with personalized service, and everyone receives caring assistance when it comes to choosing the right product to meet their unique needs. Judith says her customers are more like friends to her, so she always wants to insure that everyone is well cared for. Her magnificent staff sees to that.

30 years ago, Judith August Cosmetics found its niche. The company’s dedicated followers call it, “The most well-known, underground concealer company around.”

Facebook @judithaugustcosmetics – Instagram @judithaugustcosmetics

The Everything pencil

RIGHT NOW GET 20% OFF YOUR FIRST ORDER (Limited time)
Shop here:
https://judithaugustcosmetics.com/shop-best-concealer-makeup/

SHARE THIS POST ON: Facebook
January 15, 2018

Stowaway Cosmetics are just the right size!


All Stowaway Cosmetic products are made to go with you, wherever you go.

You won't find yourself leaving them to sit on your bathroom counter or in your nightstand drawer. Take them along without weighing down your purse. They are smaller sized products that you will love.

Did you know? 75% of women don't finish the products they purchase, not just before they expire but they don't finish them anyway. Stowaway designed products are made to be finished before their expiration date.

You can even get a $5 Stowaway credit for returned finished products! See the site for details.

Stowaway Cosmetics

Stowaway Lipstick on Right

SHARE THIS POST ON: Facebook
January 15, 2018

50 Makeup Tips Every Woman Should Know

50 Makeup Tips Every Woman Should Know

50 Makeup Tips Every Woman Should Know

Popular with drag queens, baking is a goof-proof way to ensure smooth, natural concealer all day long.

You simply apply a thick layer of loose powder, such as Coty AirSpun or Laura Mercier Loose Setting Powder, over top of your concealor before it sets with a damp sponge. Continue doing your makeup as normal, then sweep away the excess powder with a fluffy brush.

The powder traps in your body heat and fills in any lines, setting the concealer and preventing it from settling.

The result is a flawless finish that lasts all day.

Having Trouble Blending Your Shadows?

It actually may not be your eyeshadow’s fault!

After applying your eye primer, sometimes shadows can feel as if they’re sticking to the base a little too well.

Simply find a matte shade that matches the lightest area of your face then lightly apply it over any area where you originally applied primer.

Your shadows will blend much better while still getting the benefits of the primer.

This works well for those who prefer to avoid eye primers, as well, as the initial layer of powder will act as a barrier between your natural skin oils and the shadow, giving the shadows greater longevity.

If you are prone to acne, get a primer for acne prone skin instead.

Do your eyes appear small or tired?

Black liner in your waterline could be the culprit!

To make yourself look more awake, avoid applying black or other dark shades to your waterline.

Instead, pop a white or nude liner into the area; the light shade will create an illusion of larger, brighter eyes.

You can still smudge black liner or shadow along the lower lashline for a smoky, dramatic look, as the bright liner plays well with comparable darker shades while still retaining its brightening effect.
Sometimes Eyeliner Pencils Can Feel Hard Or Stiff.

To make the liner softer and easier to work with, all you need is a simple vintage tip.

Run a lighter over the tip of the pencil for just a couple of seconds then allow the liner to slightly cool.

The flame will heat up the product, making it smoother, richer, and easier to apply.

If you do not feel comfortable using an open flame, you can just as easily hold the pencil to a hair dryer, though this make take a few moments longer to achieve the same level of creamy usability.
Clumpy Mascara Is The Worst.

No one wants spidery, clumped lashes.

As a tube of mascara dries out, you may notice your lashes clumping more than usual.

Having to declump lashes is painstaking and one slip up can accidentally result in you ruining your eye makeup entirely.

An easy way to avoid this and make your mascara last longer is to pop your mascara tube into your bra or under a warm cloth for a few moments.

The heat will loosen the product, making it easier to apply.

Be careful though, as sometimes heat can cause bacteria to grow. Always follow the recommended expiration dates on any cosmetic products and use your own judgement on if you feel something is no longer eyesafe.

Is Your New Palette A Huge Letdown?

We’ve all been there, you buy a new shadow palette and are beside yourself with excitement.

You go home, start playing with the shadows and…it’s a huge letdown.

The shadows are dusty, crusty, patchy, and unpigmented.

Though you have every right to be disappointed, there may be a way to salvage your purchase.

Apply a white cream shadow or pencil to your entire lid then set it with a white shadow.

The white will allow the shadows applied over top to pop and just may help with those shades that lack pigment.

The fact that you’re using a creamy product should also help with fallout from powdery/dusty shadows, as it will help them adhere to the eye.

Some shadows cannot be saved, but it’s always worth a shot!

Winged Liner Can Be A Massive Struggle.

It totally does not have to be, though!

Many people find that they really cannot get their wings straight and even.

A quick cheat to help create a pair of crisp lines that totally sit at the same angles is to use a bit of scotch tape.

Simply tear off a small piece and stick it to your face so that it creates a guide for your wing. Match it up on the other eye, too.

Trace your liner along the tape, carefully, then peel it off to reveal a perfect line.

Fill in the liner along your lashline then repeat on the other side.

Viola! Perfect wings.

This method may take a little practice but it can be a serious time saver. Be careful when using tape, as some may experience a sensitivity to the adhesive. If you find it unsuitable, many cosmetic brands sell skin safe guides that can be used as an alternative.

This method also works to create a crisp shadow line for super smoky eyes.

Sparse Lashes Can Really Put A Damper On Dramatic Looks.

Countless women have been found to describe their lashes as “sparse” and “lacking volume”.

Volumizing mascaras can be notoriously clumpy and unnatural looking while also not living up to their packaging claims.

A cheap and easy way to help pump up your lash game uses a product you likely already have: translucent loose setting powder!

Simply dip a clean brow spoolie or dry mascara wand into the powder and apply a thin layer between swipes of mascara.

By placing powder between each layer of mascara, you’re allowing the product to better grab onto your lashes, creating an illusion of volume.

If you do not have a clean wand on hand, use a fluffy eyeshadow brush to lightly dust powder onto your lashes between mascara applications. It will work exactly the same but may take a little more time.
Want To Try The Metallic Lip Look But Cannot Justify Buying A New Product?

The metallic lipstick trend is super hot right now on social media.

Beauty Influencers everywhere are flaunting super futuristic, glowy looks featuring a plethora of products that can honestly be a bit pricey, especially if you do not see yourself wearing a metallic look in your everyday life.

An easy way to be on trend without breaking the bank or requiring you to buy another one purpose product utilizes two things many of us have already: clear lipgloss and a loose eye pigment.

Simply mix a tiny bit of the gloss with lots of the glittery pigment to give an illusion of wet, sparkly lips.

If you want a more pigmented, true metallic look, just apply the pigment directly over a lipstick in a matching or complimentary shade or use a cream liner.

Problem solved with no new purchases necessary!

Dark Circles Got You Feeling Blue?

If you’re like me, you were told to apply concealer in light dots.

The dots created a sheer coverage that looks natural but honestly does not do a lot for dark circles.

A way to still retain the natural look but also beef up your coverage is to apply product in a downward pointing triangle under your eye.

The shape allows the concealer to blend further down your face, catching any dark spots you may have missed around your eye and seamlessly blending into the rest of your makeup.

Just layer it up until you’re satisfied with the coverage and you’re all set.

Make Your Eyes Pop!

If you want your eyes to really stand out, choose a liner that has undertones that are the opposite color of your eyes in lieu of traditional black/brown/grey.

For blue eyes, choose a brown or copper liner create the illusion of brightness.

For brown eyes, navy blue.

Green eyes are best suited by shades of purple.

Cannot Find A Brush You Like?

Let’s be real, makeup brushes can be expensive, especially if you’re hoping to do makeup as a career.

It’s also sometimes hard to find brushes that work exactly how you want them to.

Struggling to find a brush that fits your needs at the right price? Follow in the footsteps of many professional makeup artists and just use paint brushes!

Tons of craft store brushes work amazingly for makeup application and are cheaper than traditional makeup brushes.

Stores like Michael’s, Hobby Lobby, and Joann’s all have massive sales too, making it an even more affordable alternative.

Sometimes Eyelashes Can Have A Mind Of Their Own.

One of the most common makeup complaints ever has to be lashes that refuse to curl.

You spend what feels like forever putting on mascara and painstakingly curling lashes, avoiding pinches and pulls, then when you look in the lighted makeup mirror an hour later, your lashes are flatter than ever.

If you’re in this same boat, maybe try a heated lash curler!

Women have recommended heating your traditional metal curler with a blow dryer for ages; this product is a safer alternative to the vintage trend.

Heated lash curlers follow the same logic as hair curlers and are far less dangerous than potentially burning your eyelid with a hair dryer torched curler.

Pencil Thin Brows Are A Thing Of The Past

Current trends favor thick, powerful brows.

This is a complete 180 from previous popular styles, which featured thin, narrow, sparse brows.

To achieve this without looking bushy, simply use thin, light strokes with a brow pomade, powder, or pencil.

Setting your brows with a gel will keep them in place all day and help your handiwork last.

Mascara Smears Are The Worst

There is nothing as frustrating as ruining a gorgeous shadow look with rogue mascara.

Fix this easily by first letting the mascara fully dry then simply wipe it away with a q-tip.

Touch up any shadow that may have also been removed and you’re all set.

The mascara should just flake right off, saving you tons of time!

Be A Bronzed Goddess

A sunkissed glow is one of the most classic, healthy looks to ever become a possible trend.

Unfortunately, it is quite easy to go from bronzed goddess to oompa loompa if you are not careful.

An easy way to get the perfect look is to apply the product in a “3 shape”, starting at your temples, looping to just under your cheekbone, then looping once again down to your chin, creating a three shape.

Use a small amount of bronzer and blend with a clean, fluffy brush after for an airbrushed, healthy glow.
Set Yourself Up For Success

It is a no brainer that using primers and powders can seriously up the longevity of your makeup.

One other long lasting savior has recently garnered some attention: setting spray.

Setting spray, also known as finishing mist, goes on as a last step in your makeup and locks in your cosmetics.

Use it through the day to refresh your face or spray your brush before dipping into pigments or metallic shadows to increase the intensity.

The Eyeshadow Order

If you feel like your shadows always end up looking muddy or not cohesive, maybe try following a simple order of placement for a soft, everyday look:

First, swipe a shadow that is close to your skintone but a couple shades darker into the crease of your eyelid.

Second, place a light color to the inner half of your lid.

Then, add a midtone color to the outer third.

Finally, in the outer fourth, add your darkest shade.

Blend all of the shades as you go, creating a seamless gradient.

For an extra pop, add the lightest shade to your inner corner to brighten your entire eye.

Add some liner and mascara and you’re all set!

Thin Lips?

In a world of Kardashians, luscious, full lips and lip plumpers have gained popularity.

If you do not want to dish out the cash for fillers or maybe just do not want to, simply follow this easy tip for a little oomph in your pout instantly:

Add a white pencil product to the center of both of your lips, blending it carefully so that it retains pigmentation but is not going to show starkly through your lip color.

Apply your lipstick and/or gloss as normal and you’re done.

You should notice an immediate difference.

Blemishes?

This sounds like a no brainer, but to help fight back against blemishes, drink more water.

Being properly hydrated has a ton of health benefits, one being clearer skin.

Drinking several big glasses of water a day and avoiding sugary sodas could make a huge difference in your skin texture and give you a nice glow.

Plus it will make you feel better in general.

Fight Back Against Dryness

Dry skin is not only often times a blow to one’s self esteem, it also can be quite uncomfortable and frustrating.

Dry skin is a persistent affliction that may leave you scratching your head.

An excellent way to help mask dryness is by moisturizing your skin.

A less obvious answer to the dryness issue is to understand foundation formulations.

A super matte foundation is going to be more prone to clinging if your skin is dry, giving it a patchy appearance.

Dry skin makeup lovers should consider using glowy or dewy foundations to help disguise the dryness and keep skin from feeling tight and uncomfortable.

If you are prone to acne, consider getting a foundation for acne prone skin.

Do Not Want To Buy A Million Lip Liners?

If you are like me, you probably have a billion lip products sitting in your vanity.

A lot of people seem to feel that each and every lip shade needs its own lip liner to match perfectly.

This is not actually true.

You can buy a clear, universal lip liner that prevents feathering and fading.

The universal, multi-purpose product will cut your collection down and save you tons of cash in the long run.

Keep Your Lip Line Crisp

Sometimes, it feels almost impossible to get a crisp, clean line around your lips.

An easy fix is to use an angled brush and concealer to carefully trace the area, cleaning up any excess product.

The same logic works for brows and winged liner too!

Soft Lips Are Happy Lips

In your beauty routine, your lips can often go ignored.

An easy way to keep them kissably soft requires minimal effort.

Simply invest in/make your own lip scrub. A ton of recipes exist online but typically they all contain sugar, coconut oil, and flavoring.

Sugar lip scrubs gently remove dead skin from your lips, leaving them soft.

After scrubbing, apply a thick balm to moisturize them from the inside out.

A Little Known Liner Saver

Do you ever mess up so badly you wish you had a tiny eraser to clean up your wing?

What if I told you several brands sell exactly that!

You can buy makeup eraser pens from tons of companies at many different price points.

Simply use it like any other eraser and fix makeup errors without removing your entire face.

Liner Looking Patchy?

When a liner is almost ready to be tossed, it can quickly begin to dry out and go patchy.

A quick fix for this issue is to apply a matching shadow over top, creating a luxe, lush, full color.

Shadows also act as setting powders, upping the wear time of your liners exponentially.

Lackluster Lipstick?

Is your lipstick fading quickly or smudging all over everything?

You could invest in potentially drying liquid lipsticks but you could also just as easily follow this handy tip that utilizes products you likely already have!

After applying your lipstick, blot your lips with a sheet of tissue then dust a thin layer of translucent setting powder.

Tired Of Not Having Enough Of Your Favorite Brushes Clean?

Invest in a color switch, a nifty product that allows you to remove excess pigment from your brushes and ensure a clean blend.

If you are not interested in buying any new expensive products, just use a hair donut or bun mold. The fibers are the same and will have similar results.

This does not replace regular cleanings but can work in a pinch if you need to use a specific brush for a look. A makeup organizer can also work wonders to help you keep things neat and tidy.

Be Your Best You

One of the best things you can do to enhance your makeup skills is learn to identify face and eye shapes, especially your own.

Get to know your features, specifically your eyes, cheekbones, and jawline.

Before working on a client try to figure out what they fit as.

This technique may take some time to master but investing time to learn it will make your applications infinitely easier.

Struggling With Liner Application?

Try staring down into your mirror, not in a straight line.

Looking down while applying top lid liner will open up the space, preventing a line to form in your crease if you look up.

It will also make your application much easier, as you can see your entire lid space.

Add Some Height!

Via highlight! Add some height to your brows by highlighting directly under them.

This practice makes your entire eye area look larger and more awake.

It also helps to make your brows appear more crisp.

Just apply a white pencil or powder thinly under your brows and blend thoroughly.

Shaking?

If you find yourself unsteady while applying eyeliner, there are two possible solutions for you.

One is obvious: stabilize yourself. Rest your hands on your knees or a flat surface before applying the liner.

The other is a great possibility for anyone. Instead of drawing one line for your liner, draw a series of dots then connect them.

The second method gives you more control, allowing any errors to be caught early.

Mascara Clumping Up?

If you find your mascara is clumping and nothing else is working, try waiting a bit longer between applying a second layer.

Waiting allows your lashes to settle and gives the second layer something to grab onto which helps prevent clumping.

Nice lashes are key to most makeup looks and this hack really helps ensure you nail it everytime.

Red Eyes?

Are your eyes red? Irritated?

Is it hurting your self confidence?

Apply a liner with a blue undertone, specifically a white one if possible.

This will help mask the redness and make your eyes look bright, healthy, and awake.
The Plastic Spoon Trick

This one may make you laugh but it really does work!

The plastic spoon trick prevents your eye makeup from being ruined by rogue mascara spots.

Simply hold the spoon against your upper or lower lashline, correlating to which you are currently applying product onto, and apply as normal.

The plastic spoon catches any product that would have potentially ended up on your eye, ruining your makeup.

Learn Where To Highlight Your Eyes

Your eyes are the windows to your soul.

Learning where to highlight them can make a huge difference in your overall makeup appearance.

The typical highlight layout is a trio of placements: your browbone, inner corner, and the center of your lid.

Placing a shadow in the inner corner opens your eyes and makes you appear awake and bright.

The browbone highlight makes your eyes appear larger and your brows appear crisp.

Finally, the center of the lid highlight gives dimension, especially if you use a shimmer shade.

Matchy Matchy

Matching your foundation can be a big pain.

No one wants their face to be lighter or darker than their body, as too light can make you look sick and too dark often pull orange and juxtapose against your natural tone.

To match your foundation effectively, match it to your neck instead of your face.

Your neck will peek through whatever foundation you use and is often lighter than your face, so matching to it prevents any harsh lines and gives a seamless appearance to your upper body.

Put Makeup On Your Neck

One key way to create a flawless, natural makeup look is to blend foundation down your neck.

This may sound silly, but applying makeup only to your face can leave a defined line on your jaw that may appear masklike.

Blending down your neck only takes a few seconds and can really help everything meld together perfectly.

Cleavage Contouring

Another extra step that may come across as silly, this tip will likely only be appealing to a specific few people.

Contouring your cleavage is a great way to add oomph to any evening event attire.

To do this, trace around your natural cleavage with cream contour and blend.

Also contour your collarbone area, adding highlights to the high points of your body.

Downward Strokes

When you put on foundation, it may be tempting to apply it as quickly as possible and not pay much attention to the movements of your brush.

If you have peach fuzz on your face, applying it in downward strokes can make a huge difference, as it sticks the hairs down.
With a sponge, try to use patting motions while downward stroking. This gives an even blend while still pinning down the fuzz.

Lowered Coverage

If you’re going to be out in the sun, full coverage foundation may not be appealing.

To prevent having to buy a new foundation for hot days, just play cosmetic chemist and make your own do-it-yourself tinted moisturizer.

Just mixed some foundation into your favorite moisturizer and voila! You’re all set.
Save Your Mascara Wands

Have you ever found the absolutely perfect mascara wand that was paired with an awful mascara?

Save the wand to use with your favorite formulation!

Also, saving random wands over time can prove to be a very smart practice.

They can be used as brow spoolies, for special effects, to pin down baby hairs around your face, and a host of other uses.

Just rinse them off then clean them with alcohol.

Halfie Lashes

Do you struggle to apply false lashes?

Chop them in half!

Cutting lashes in half gives you more control, allowing you to better place your corners to prevent them from peeling up.

Proper placement ensures they will look natural and feel comfortable all day.

Check Your Expiration Dates

Did you know that most cosmetics expire?

Cosmetics come in contact with your skin, brushes, and the air, exposing them to a host of bacteria.

The average rule of thumb for most common products is currently:

Mascara: Three Months

Liquid Liner: Six Months

Liquid Foundation: Six Months

Concealer: Six Months

Lipgloss: Twelve Months

Lipstick: Twenty Four Months

Cream Eyeshadow: Twelve Months

Brow Gel: Twelve Months

Lip + Eye Pencils: Twenty Four Months

Powder Products: Twenty Four Months

Some products may last longer so always read the labels on your products.

Use Lipstick As Blush

If you want a natural, glowy blush, check your lipstick bin!

Lipsticks give a sheer, brightening cheek color and are perfect for more natural days.

Always check your ingredients but if you’re all clear of pore cloggers or breakout triggers, definitely give it a try!

Cover Those Dark Circles

If you find yourself battling dark circles, grab a salmon color corrector!

Anything peachy or orange toned will help mask the purple and blue of a dark circle.

If the concealer clashes with your skintone, apply a thin layer of your normal concealer over top and foundation.

You will have flawless under eyes in no time!

Go Red

Red lips are timeless. They’re the epitome of vintage glam while also being so on trend.

Finding your perfect red can be a truly revolutionary experience.

Once found, your red shade can be thrown on with any outfit, hair, or look to give a touch of bold sass.

I personally lean towards blue based reds, as they make your teeth appear very white and bright.

Invest In Your Brows.

Your eyebrows frame your entire face.

Invest time and money into them above most other things, as a good brow can save everything while a bad brow can cause your other makeup to fall flat.

Research brow shapes for your face and either do it yourself or pay someone to pluck them down.

Learn what products work best for you and stick with them, form an arsenal of brow slaying tools.

Your brows can truly make a huge statement, choose them wisely.

Get Sexy, Wet Looking Lashes

On natural days, you can still amp up your lashes and make them really play into your look.

Use a clear brow gel lightly to give definition and a “I just returned from the ocean” vibe.

This tip is super understated and sexy while also finding a second purpose for a usually unitasking product.
Pat Magrath’s Natural Blush Hack

Pat Magrath is renowned as one of the greatest makeup artists of all time. If she recommends something, you know it’s going to be good.

Magrath recommends blotting away foundation from your cheeks before applying blush to give a natural, real life look without caking up.

This hack gives you the essence of a youthful, fresh face, with less work and product used.

Color Coordinating

If you like natural, fresh-faced flush makeup, this tip is perfect for you.

Match your blush to your lipstick for a perfect touch of cohesion.

It is a great way to look put together and public ready without much thought.

Fill Them First

Shaping your brows can be a daunting task; one wrong move and you’ve gone from artfully arched to dreadfully thin.

An easy way to ensure you do not pluck too much or leave a bit more than you planned behind is to fill in your brows first.

Using your usual product, fill in your brows normally.

Pluck whatever stray hairs remain.

If you are still struggling with getting everything in line, fill in your brows heavier than usual with a strong, dark outline to clearly show where desired brow line ends and scraggles begin.

Eyes Appear Small?

If you are doing a smokey eye and notice your eyes look closed off and small, do not worry!

A simple tweak in your usual routine could make all the difference in the world.

Instead of lining your eye entirely with black, try just shading the outer corner. This in tandem with a inner corner highlight will brighten and open up your eyes, making you look awake and bright.

Skin Discolored Or Dull?

Try an illuminating primer!

The illuminating agents in the primer will catch the light, making your skin appear glowy and not at all dull.

The same light catching technology will help direct attention away from discolored areas.

Plus you will look positively lit from within.

Vintage Lash Tricks Sometimes Actually Work

For an instant lash boost, place a clean cotton bud or brush handle under your lashes near the base.

Keep it there as the mascara dries. The added lift will stay when the product is set, giving you plump, bold lashes in seconds.

This tip is not for everyone but it definitely does work!

Highlight Too Glittery?

While glittery, intense highlights may be stunning, some prefer a more low key look.

If your highlighter appears too glittery on the skin, maybe consider that it could possibly have an overspray.

A lot of brands will spray glitter in a thin layer over the top of a product to make it look prettier in the pan and encourage sales. The glitter does not translate well to the skin, but fear not!

With a steady hand, you can scrape away the glittery top coat and reveal a stunning product below. Many lower price bronzers do this as well; removing this glitter often reveals pretty lovely results.

Is Your Liquid Lipstick Not Drying?

Liquid lipsticks are all the rage right now, especially the matte ones that are kiss proof and dry down for a long wear time.

The only issue is that sometimes they can feel and look incredibly dry on the lips.

Do not apply balms before application!

Applying a balm directly before your liquid lipstick can prevent it from drying down and drastically reduce its longevity.

Instead, start a nighttime routine of exfoliating with a sugar lip scrub and applying balm before bed. Your lips will look and feel better than ever, making application much easier without compromising the product.

Want An Instant Face Lift?

When applying contour to your cheeks, try using a cream.

Apply the cream just below your cheekbone and blend upwards instead of down.

The upward blending will create a soft contour without dragging your face down, giving the illusion of youthful skin.

Love Cheek Stains?

Cheek Stains (think Benefit’s Benetint) are incredibly popular in many areas of the world. Ranging from liquids to creams to sticks, there truly is something for everyone in this realm of products.

When using cream or stick stains, you may find it hard to apply the product smoothly.

To fix this issue, try mixing a small amount of product with a carrier oil (like sweet almond, jojoba, etc) then blend it in layers over the skin. The oil will help ensure a smooth consistency and help alleviate any patchiness.

Oils will also improve the skin’s texture over time and help disguise any skin texture to give a flawless finish.

Check Your Texture

If you find that products often crease into your lines, wrinkles, or scars, consider that it may be time to swap your cosmetics.

Thin, watery foundations are more likely to slip into lines while stiffer products will fill them.

Using a filling primer will also help a lot, as pore fillers use silicon to bridge uneven textures in the skin and give a smooth base for other products.
Stiff Pomade?

Brow pomades are all the rage right now.

Many are super creamy, pigmented products but some options may be a bit harder to work with.

If your pomade feels waxy or stiff, try warming it on the back of your hand. Scoop out a bit from your pot with a spatula or brush and knead it on the back of your hand with your utensil of choice. From your hand, apply it to your brows as normal.

Your body heat will warm the product, making it easier to apply.

SHARE THIS POST ON: Facebook
December 4, 2017

’tis the season for Crystal Parties, covetable Stocking Stuffers from Hynt Beauty

Crystal Party Set & Hynt’s
Stocking Stuffer Mini-Sets

Holiday 2017

Crystal Party Gift Set

Introducing Crystal Party, our Holiday 2017 gift set that includes many of our top selling favorites!  Featuring clean, luxurious makeup and skincare essentials like our NOCTURNE Mascara, our matte, titanium-dioxide free blush in Notoriously Nude, and the most versatile, makeup artist-loved pressed eye shadow in Taupe; we make it easy for you to try the products you keep on hearing about!

The set includes:

PERFETTO Pressed Powder Eyeshadow Single in Crystal Taupe
NOCTURNE Mascara in Black
FORTE High Definition Eyeliner Pencil in Black
LIBRE Luxurious Lip Gloss in Burgundy Cherry
ALTO Matte Blush (Deluxe Sample) in Notoriously Nude
SKIN PREP SERUM Deluxe Sample Size
MSRP $59.00 (Actual value $96.00)


SHARE THIS POST ON: Facebook
November 12, 2017

Karim Orange teams with Vapour Organic Beauty

The Inner Orange Spark and Crave Collections

“My clients are always amazed by how I’m able to transform them with such a little amount of makeup. I do this by practicing a holistic approach to artistry, that I have coined as ‘Low Beauty’. ”

— Karim Orange

What happens when a two-time Emmy Award nominee make-up artist, who knows a thing or two about the products we put on our body to make us look good develops a violent reaction to an everyday product?? She makes it her mission to fully understand the dangerous effects that chemicals and unnecessary ingredients have on our body. Leading the charge for increasing transparency in the personal care industry and advocating for more choices for women who do not want to sacrifice beauty for fear of harmful chemicals and additives, she teams with cosmetic company Vapour Organic Beauty; a company committed to creating cosmetics that are safe and creates Inner Orange Beauty. The results are magical!

Karim Orange believes in ‘Low’ Beauty and ‘Low’ Beauty Makeup Artistry. Three holistic elements are incorporated to achieve maximum results.

Step 1:             Use products with the least amount of undesirable ingredients. She uses the Premium Body Care Unacceptable Ingredients guidelines by Whole Foods Market as a parameter for this.

Step 2:            Use the least amount of products to get maximum results. If you are using 10 products, she’ll get you to 7, if you use 5 she’ll get you to 3…. and you will be amazed as to how much better you look with the simplicity!

Step 3:             Use products that have minimal amount of carbon footprint in the production and packaging….good for both you and the planet.

The Inner Orange Spark and Crave Collections are comprised of three products each: Aura Multi-Use, Elixir Lip Gloss and Solar Translucent Bronzer.  The formulas are 70% organic, easily blend-able and layer-able. I tried the Spark and I would also try the Crave, so don’t be afraid of the darker color palette! I found myself using them as eye shadows, blush, contouring, and lipsticks and was having a blast playing with them. And better than the fun I was having playing with them was the glow I noticed I had…not heavily made up but fresh, natural, like I had just been to the spa or gym. And definitely emphasizing all my assets…with staying power! Finding a makeup that lets me look gorgeous naturally and skips the toxins? I am building a shrine to Karim! As well as following innerorangebeauty.com and thatorangegirl.com.  I have a feeling I will be learning a lot from her in my continuing journey to become holistically hip!


innerorangebeauty.com/

innerorangebeauty.com/


Post by: Kathy Hodge


SHARE THIS POST ON: Facebook
October 23, 2017

Elizabeth Arden Plush Up Lip Gelato is not your grandmother’s lipstick


Elizabeth Arden Plush Up Lip Gelato line is a sheer, moisturizing formula that softens lips while giving them a pop of color. Lipstick is something I generally don’t gravitate towards in my
make-up purchases. It always struck me as something an older woman would wear and I wanted to avoid having a clown-mouth look, when I’ve tried it on, it always seemed like way too much. I have relatively small lips so any tiny lipstick mark outside of my lip line made me look slightly crazy and ready for a Halloween party.

The Plush Up Lip Gelato by Elizabeth Arden is not your grandmothers lipstick though. I was pleasantly surprised when I first tried it on before work, make-up remover wipe in hand ready to wipe off the mess I was about to make, and found that zero touch ups were required after one quick swipe across my top and bottom lip. The gel formula with vitamin A, E & rosemary extract glides on smoothly and conditions your lips which not only makes them appear fuller, but you don’t need to worry about it looking dry and cracked. The color is sheer, so you can easily have a
more subtle look, or build it up for a night out with another coat or two.

The colors are complimentary so you can easily mix shades for a more unique color. I tried Strawberry Sorbet and Pink Lemonade which worked nicely together for a pinky, orange hue. There are over 20 shades available, so definitely worth checking out if you want to step up your lip color game with controllable color that protects and locks in moisture.


Elizabeth Arden

SHARE THIS POST ON: Facebook
October 23, 2017

Hard Candy’s 2017 Halloween Collection has arrived

SHARE THIS POST ON: Facebook
October 2, 2017

Donna’s on-the-go beauty kit

These are miniature versions of roller lash mascara & Nars orgasm blush

I need an easy way to keep myself fresh with small amounts of products that I need at any given time

Donna Spangler Actress & Producer

As an actress, producer & business woman, I am often on the go.  Weather it is on a formal trip or just a day trip, I need to have my beauty items handy to look & feel my best.  When we are on the road or going places where we may need to primp or completely do our makeup or freshen up, it is great to be prepared with a little beauty kit with all the essentials needed to look your best. The problem is taking everything you need in normal size containers you may need a suitcase. I have come up with a solution for this!
Donna’s on-the-go beauty kit made with samples

Beauty kit

ON THE GO BEAUTY KIT

In today’s world, we want to look our best at all times with the least amount of effort. I have come up with essentials every girl should have on hand, so you will be able to look fresh whether you are on the go, staying overnight with your boyfriend or simply need a touch up. Stash these necessities in your purse, and you will always be prepared.

I love samples. It gives me a chance to try high-end products of all sorts. Since you receive ample amounts in small packaging, you can make a full-on beauty kit to haul along in your purse. This can be very effective, especially when you may be out somewhere away from your packed arsenal of at home products.

First, you need a case for your makeshift beauty kit. It should be something you can fit easily into your purse. I used a handy foldable holder that I had received from a business flight, but you can also get a makeup holder at the 99 cents store or any drugstore. Just make sure it is somewhat flat and can be comfortably stowed in your purse.

Next comes the fun part. You need to get the ingredients to put into your kit. Take a trip to the department store and get samples of makeup base that fits your color, creams, perfumes, liner, mascara, gloss or whatever useful items you can find. I like the samples that are in flat packets because they are easy to fit into the kit. The other alternative is to have the salesperson make samples for you. High-end lines usually have tiny plastic containers the size of a quarter with tightly sealed lids that will work for your kit as well. Gather all the essentials possible in one visit.

You can also gather the beauty freebies attained through larger makeup purchases. These items tend to be smaller and can be easily stored in your kit. Figure out when makeup lines are offering free gifts, and keep track any ‘points’ you’ve accumulated (Sephora’s point system gives spectacular yet small gifts). Sephora also sells small beauty items as you are standing in line which are great for your beauty kit as there is everything from small hairspray and mascara to pint size foundation.

Add a sample perfume of your choice. I recommend a black or brown eye pencil, earth tone shadow, sample mascara (I like ARMANI – and they are small!). If desired, throw in a couple of packages of Advil for those emergency days. Remember one feminine product (tampon), and put in a flat comb and hair band so that you can tie back your hair when you wash your face. A few Q tips and cotton balls are a must – store them in a tiny sealable baggy.

Pick up some shine eraser sheets (Elf Brand makes a great one). Get a pocket-sized toothpaste and
toothbrush. I have

Dental Floss

gotten these items in hotels as well as in airline kits, or you may already have a few saved. Also add a small dental floss or put two or three dental claws into the kit.

You can also add any samples or small packed products that you think you may need. Go to the section in the drug store where they have the samples. Other items to consider are razors, baby wipe samples, mouthwash, face wash, etc

I also like collecting hotel items because they can be used in your kit. When it is put together, it should supply you with what you need for one day or night out. It is great if you are spending the night at a friend’s house and want to appear fresh without bringing a suitcase.

You can keep your kit in your purse or car so you will be prepared to look, smell and feel your best at all times. This inexpensive condensed beauty kit is incredibly handy, and you will be glad you took the time to have it constantly within your reach. Knowing you are prepared to wow in any situation will give you a priceless piece of mind.


ON-THE-GO BEAUTY KIT

6 Q tips, 2 cotton balls, samples of eye makeup remover or cream to remove makeup, and tissues (there is nothing worse than running eyes at the end of a night. These essentials can fix this pesky problem)

Put the cotton balls, Q tips and tissues into a small sealable plastic baggie

One black liner to re-apply for later

One black or brown mascara

Brown or earth toned eye shadow

Blush in your favorite color (I like NARS orgasm), brush for application

Your favorite color lip liner

Lighter lip gloss to go over liner

Add a few samples of foundation in your color and bolting powder paper

Get some perfume samples perfect for your kit

Small tube toothpaste, toothbrush, floss and gargle (Remember, these should all be sample sizes)

1 feminine product, small comb, ponytail holder and package of Advil

With this kit, you will be ready for your on-the-go life and always look your best!

There are also mini flat irons & curling that are as tiny as a few inches long.

SHARE THIS POST ON: Facebook